An All-in-One, Multi-platform Emulator frontend for the libretro API.
Unlike standalone emulators, RetroArch uses a library file called a ‘libretro core’ for each console. This allows all emulators to use one menu screen, as well as load custom shaders, filters, playlists, and many more advanced features.
Downloads
RetroArch
Windows
Stable
https://buildbot.libretro.com/stable
Nightly
https://buildbot.libretro.com/nightly
Nightly Updater
https://stellarupdater.github.io
Compilation guide:
https://wiki.libretro.com/index.php?title=Building_Retroarch_on_Windows
Linux
sudo add-apt-repository ppa:libretro/testing
sudo apt-get update
sudo apt-get install retroarch
Compilation Guide:
https://github.com/libretro/RetroArch/wiki/Compilation-guide-(Linux)
Lakka
The official Linux distribution of RetroArch and the libretro ecosystem.
Transforms a small computer into a full blown game console.
Android
https://play.google.com/store/apps/details?id=com.retroarch
Cores
You can download a zip file of all cores or individually through the RetroArch Online Updater Menu.
https://github.com/libretro/common-shaders
- Click the blue checkmark on the "latest" folder and click the download icon
- Create cores folder in the main directory
- Unzip cores to folder
Command-line
You can launch games from GUI binary/shortcut or Terminal using the command-line.
https://github.com/libretro/RetroArch/wiki/Using-the-command-line
Linux
retroarch -L "/Path/To/libretro/core.so" -c "/Path/To/Config.cfg" "/Path/To/Game.rom"
Windows
Enable RetroArch In Command Prompt
- Control Panel → System and Security → System → Advanced system settings
- Advanced Tab → Environment Variables → System variables → Path
- Add C:\Path\To\RetroArch (Separate multiple paths with semicolon ;)
retroarch -L "C:\Path\To\RetroArch\cores\core.dll" -c "C:\Path\To\Config.cfg" "C:\Path\To\Game.rom"
BIOS
Place in \RetroArch\system directory.
Note: No roms, bios, or copyrighted game files are hosted or linked on this site.
Recommended Cores
Core Compatibility List
http://wiki.libretro.com/index.php?title=Main_Page#Core_Content_Compatibility_Lists
| Console | Core | Options |
| Arcade | MAME 2014 | Default Video Thread: Off Correct BIOS zip in ROM folder Press Right Arrow for OK |
| Neo Geo | FB Alpha | |
| Atari 2600 | Stella | |
| Atari 7800 | ProSystem | |
| Nintendo | Nestopia UE | NSTC Filter, Palette |
| Super Nintendo | bsnes-mercury | Default |
| Nintendo 64 | Mupen64Plus | GFX Plugin: glide64 CPU Core: dynamic_recompiler Texture Filtering: N64 3-Point |
| Game Boy | Gambatte | GB Colorization: auto Internal Palette: Blue Color correction: on |
| Game Boy Color | TGB Dual | Default |
| Game Boy Advance | mGBA | Skip BIOS intro: On |
| Nintendo DS | DeSmuMe | CPU cores: 1-4 CPU mode: JIT Screen Layouts |
| PlayStation |
Mednafen PSX PCSX ReARMed (Pi/Mobile) |
CPU Overclock: On Skip BIOS: On Texture Filtering: bilinear GTE Pixel Accuracy |
| PSP | PPSSPP | Rendering Mode: buffered Texture Scaling: hybrid_bicubic Anisotropic Filtering: 16x Internal Shader (Optional) |
| Master System | Genesis Plus GX | NSTC Filter |
| Genesis | ||
| Saturn | Yabause | Default |
| Dreamcast | Reicast | Default Widescreen (Optional) |
| 3DO | 4DO | |
| DOS | DOSBox | |
| Amiga | PUAE | Default |
| MSX | fMSX |
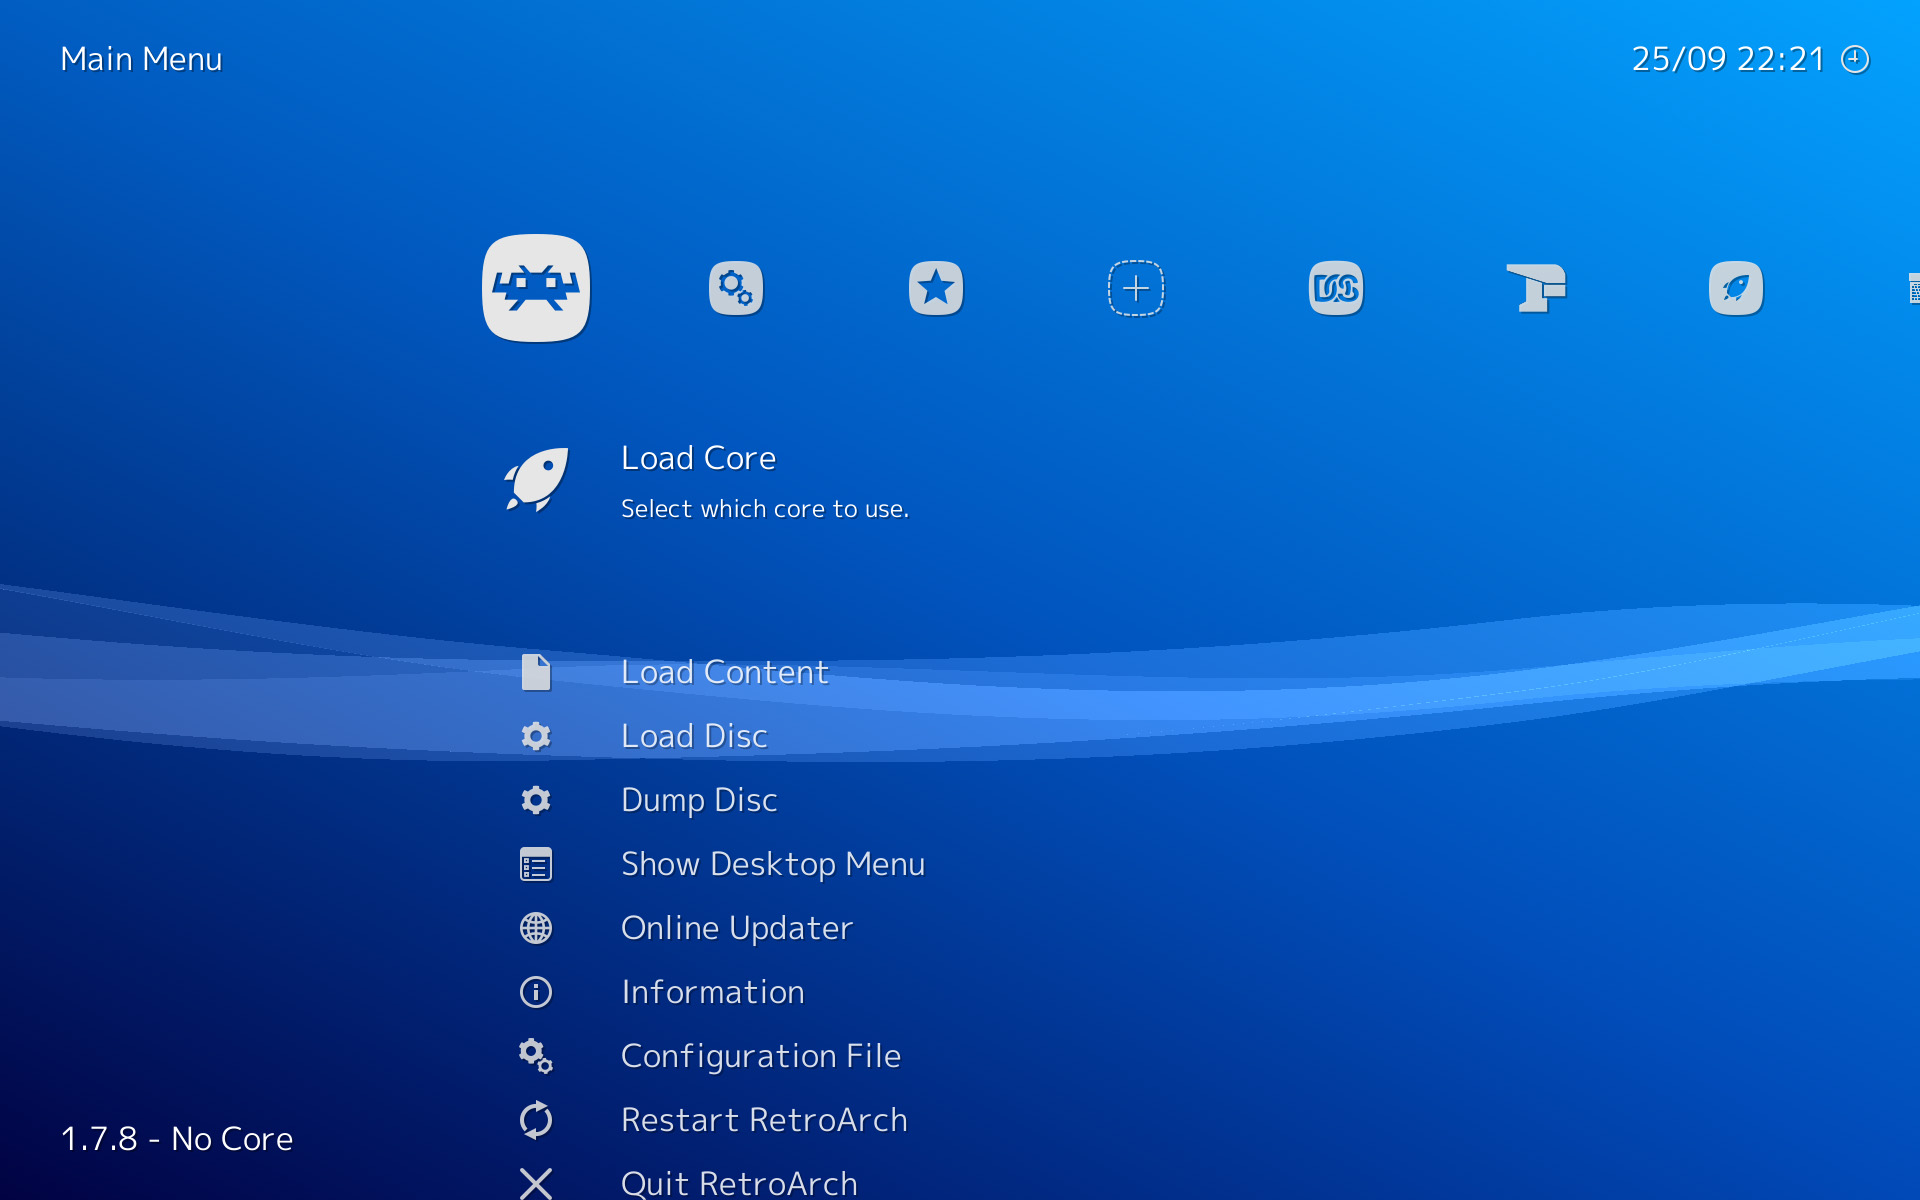
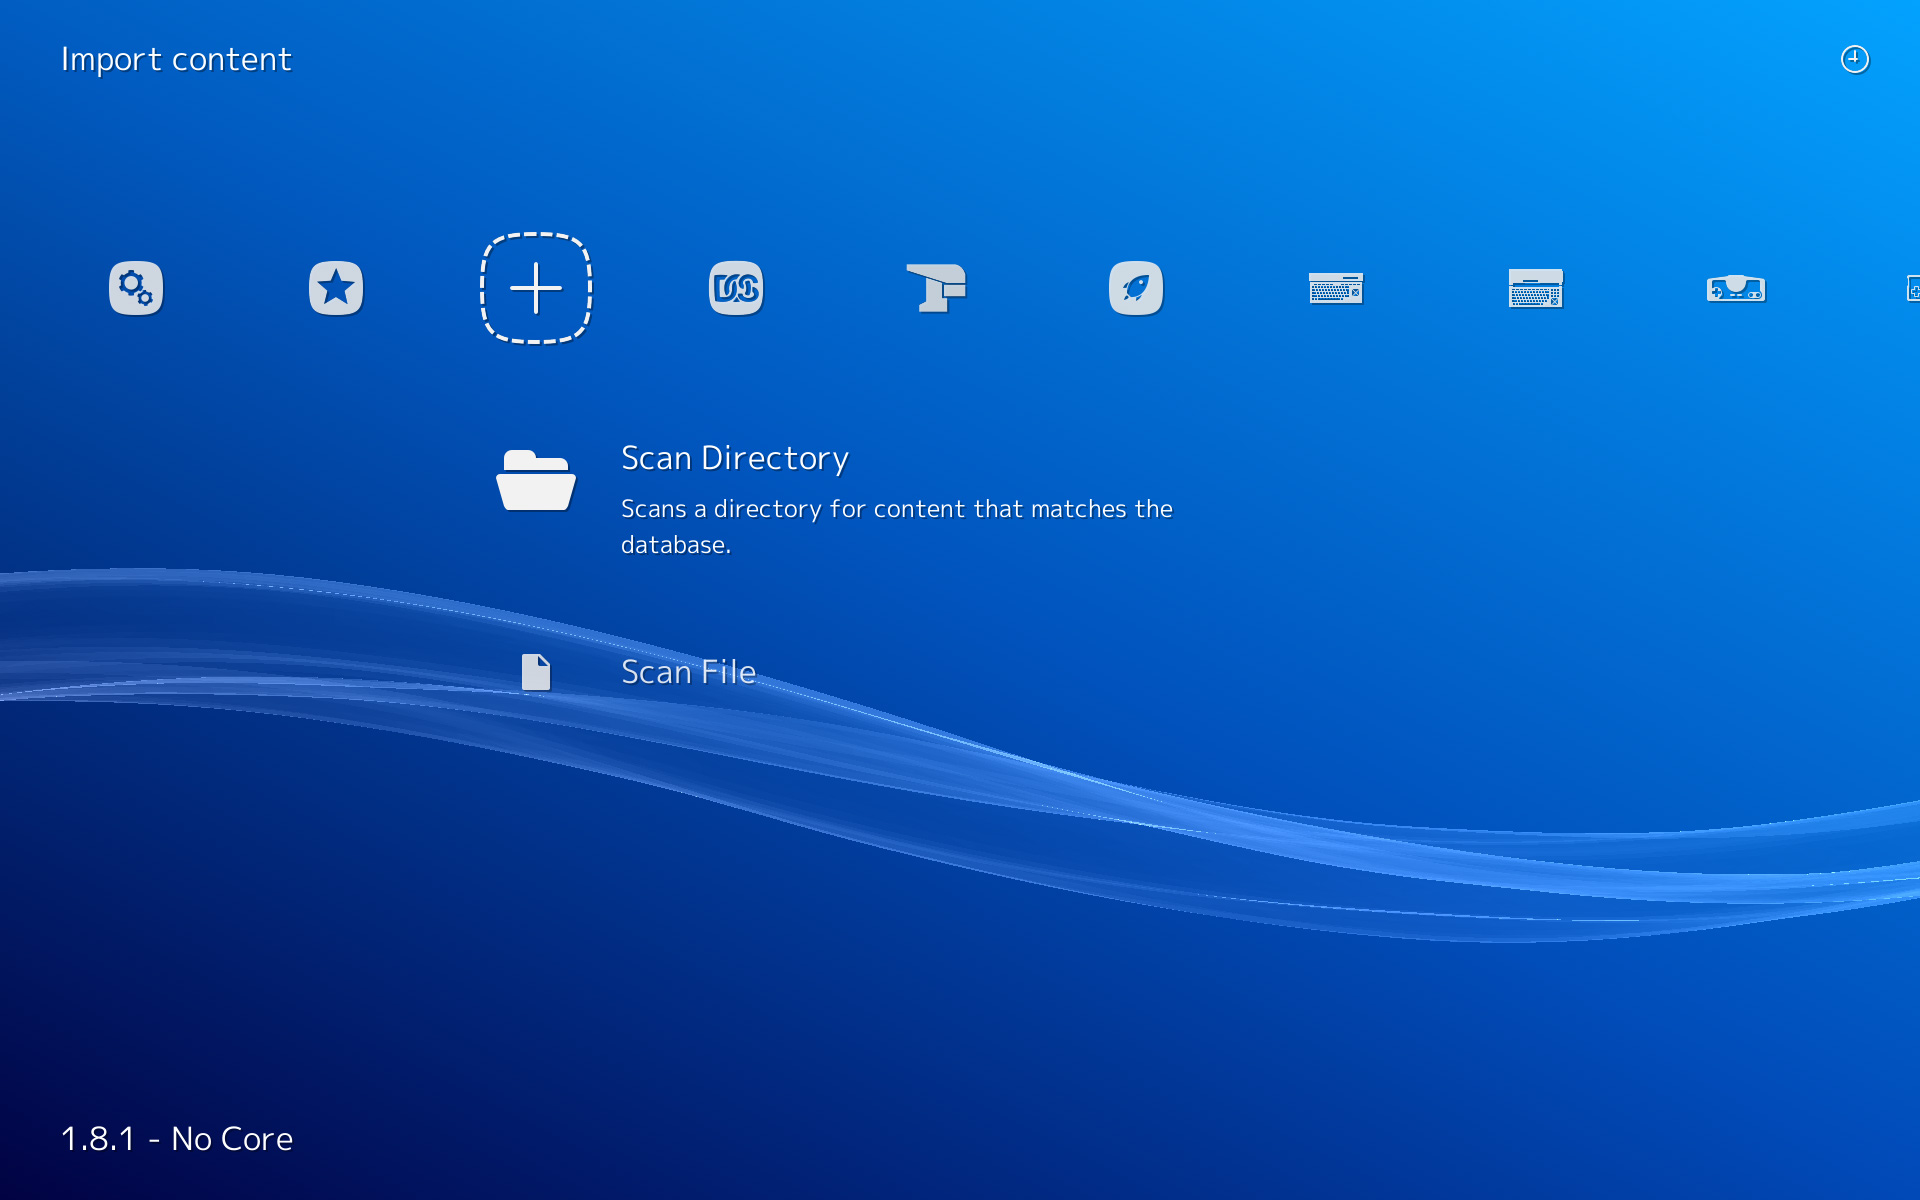
Add Games
- Main Menu → Add Content
- Scan Directory → Scan This Directory (Checksums must match or games won't appear)
- Go back to Home Screen
- Settings → Playlists → Set each Playlist's Default Core
- In the Main Menu you will now see a Playlist for each console.
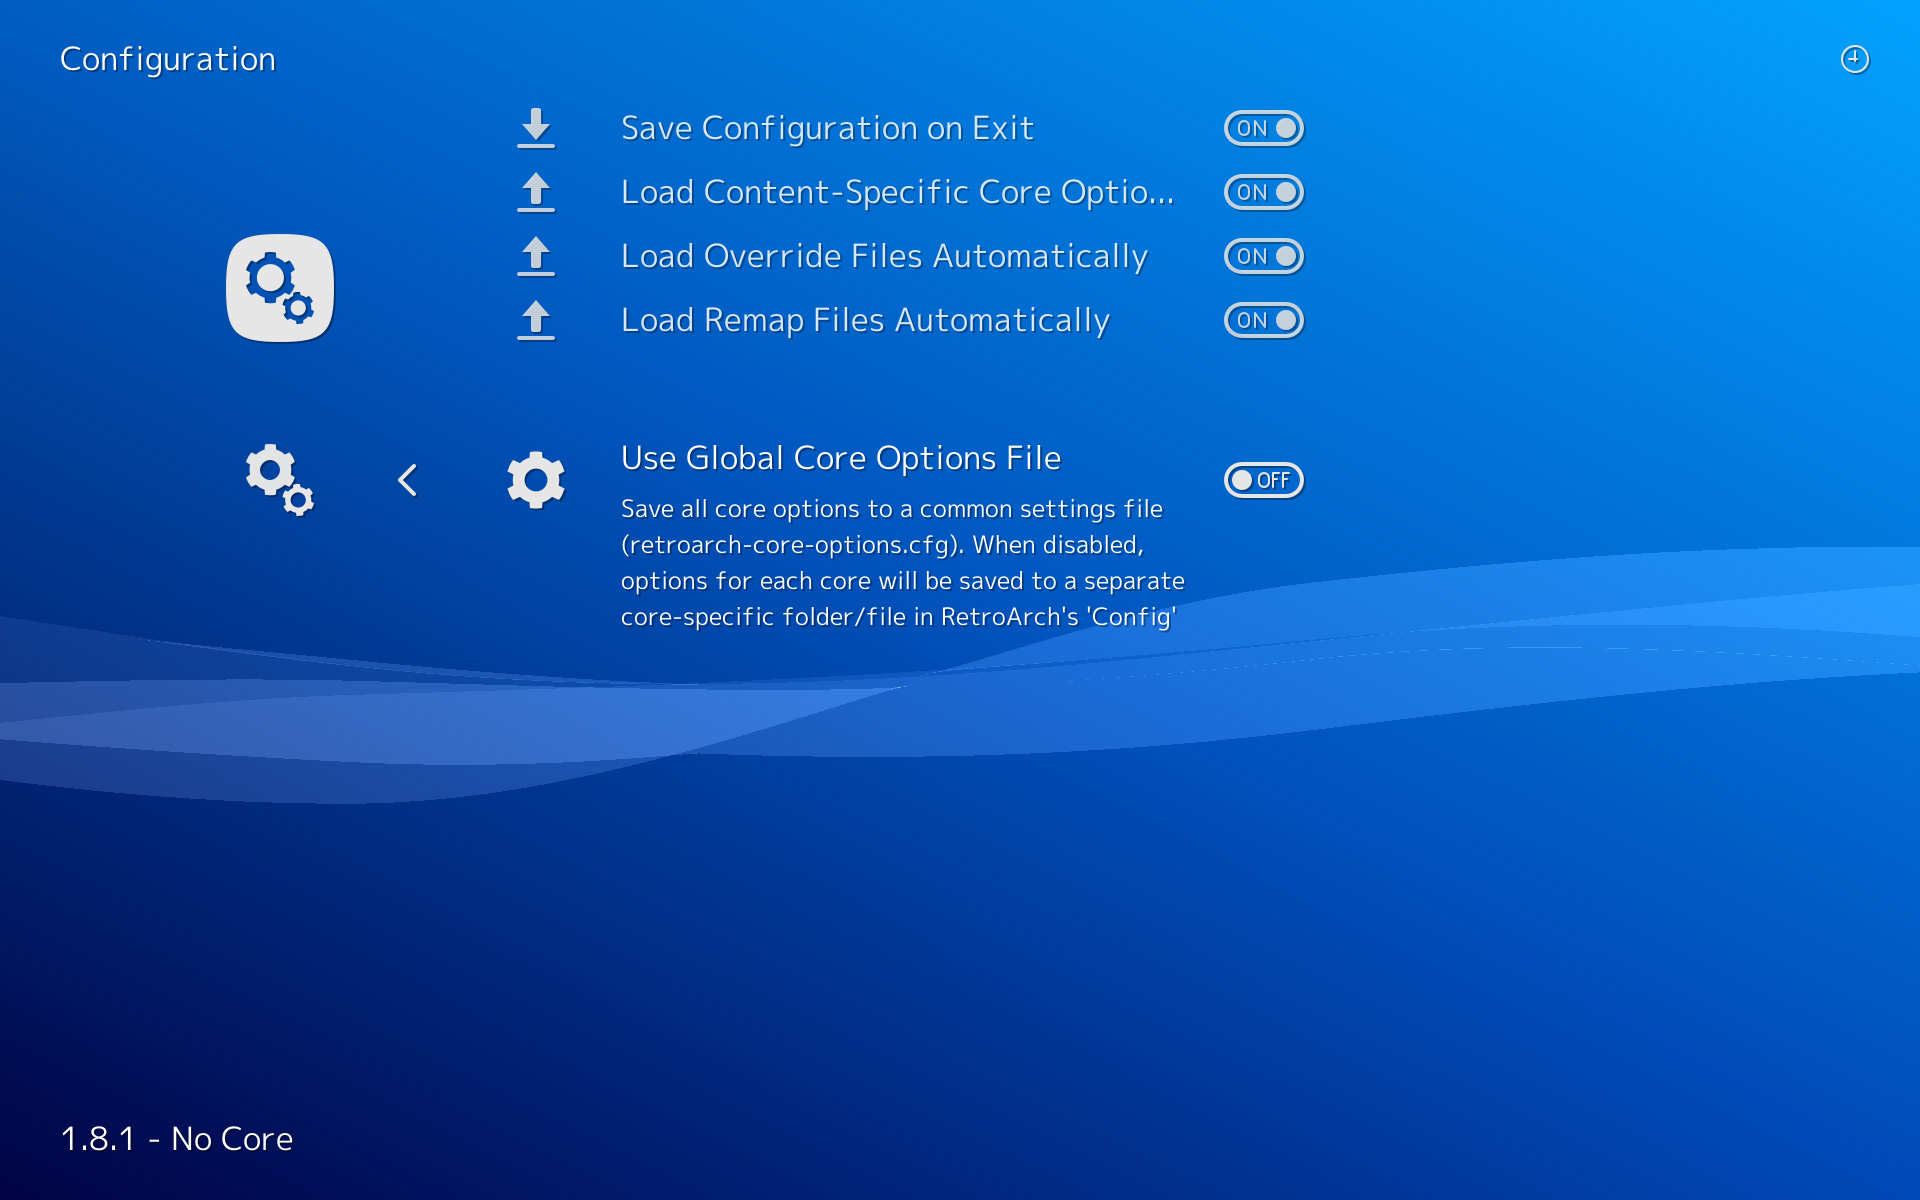
Configuration
- Using the menu, set your default settings to be as the master configuration. It will be saved to retroarch.cfg.
- You can save new config files for each Emulator Core, or use Overrides (Recommended).
- Configuration .cfg files are saved to \config.
Overrides
Creates a config file that will load automatically and override the default retroarch.cfg when launching a game.
Useful for different Resolutions, Video, Audio, & Shader settings per Core.
- Turn off "Use Global Core Options File". Instead of saving all core options to a single retroarch-core-options.cfg file, it will instead put each in its own folder in the \config directory.
- You can save new config files for each Emulator Core, or use Overrides (Recommended).
- Override files .opt are saved to \config\[Name of Emulator Core].

Console Screen Resolutions
Setting these resolutions in each emulator’s configuration file can improve performance and remove unwanted black bars on the top and bottom of screen.
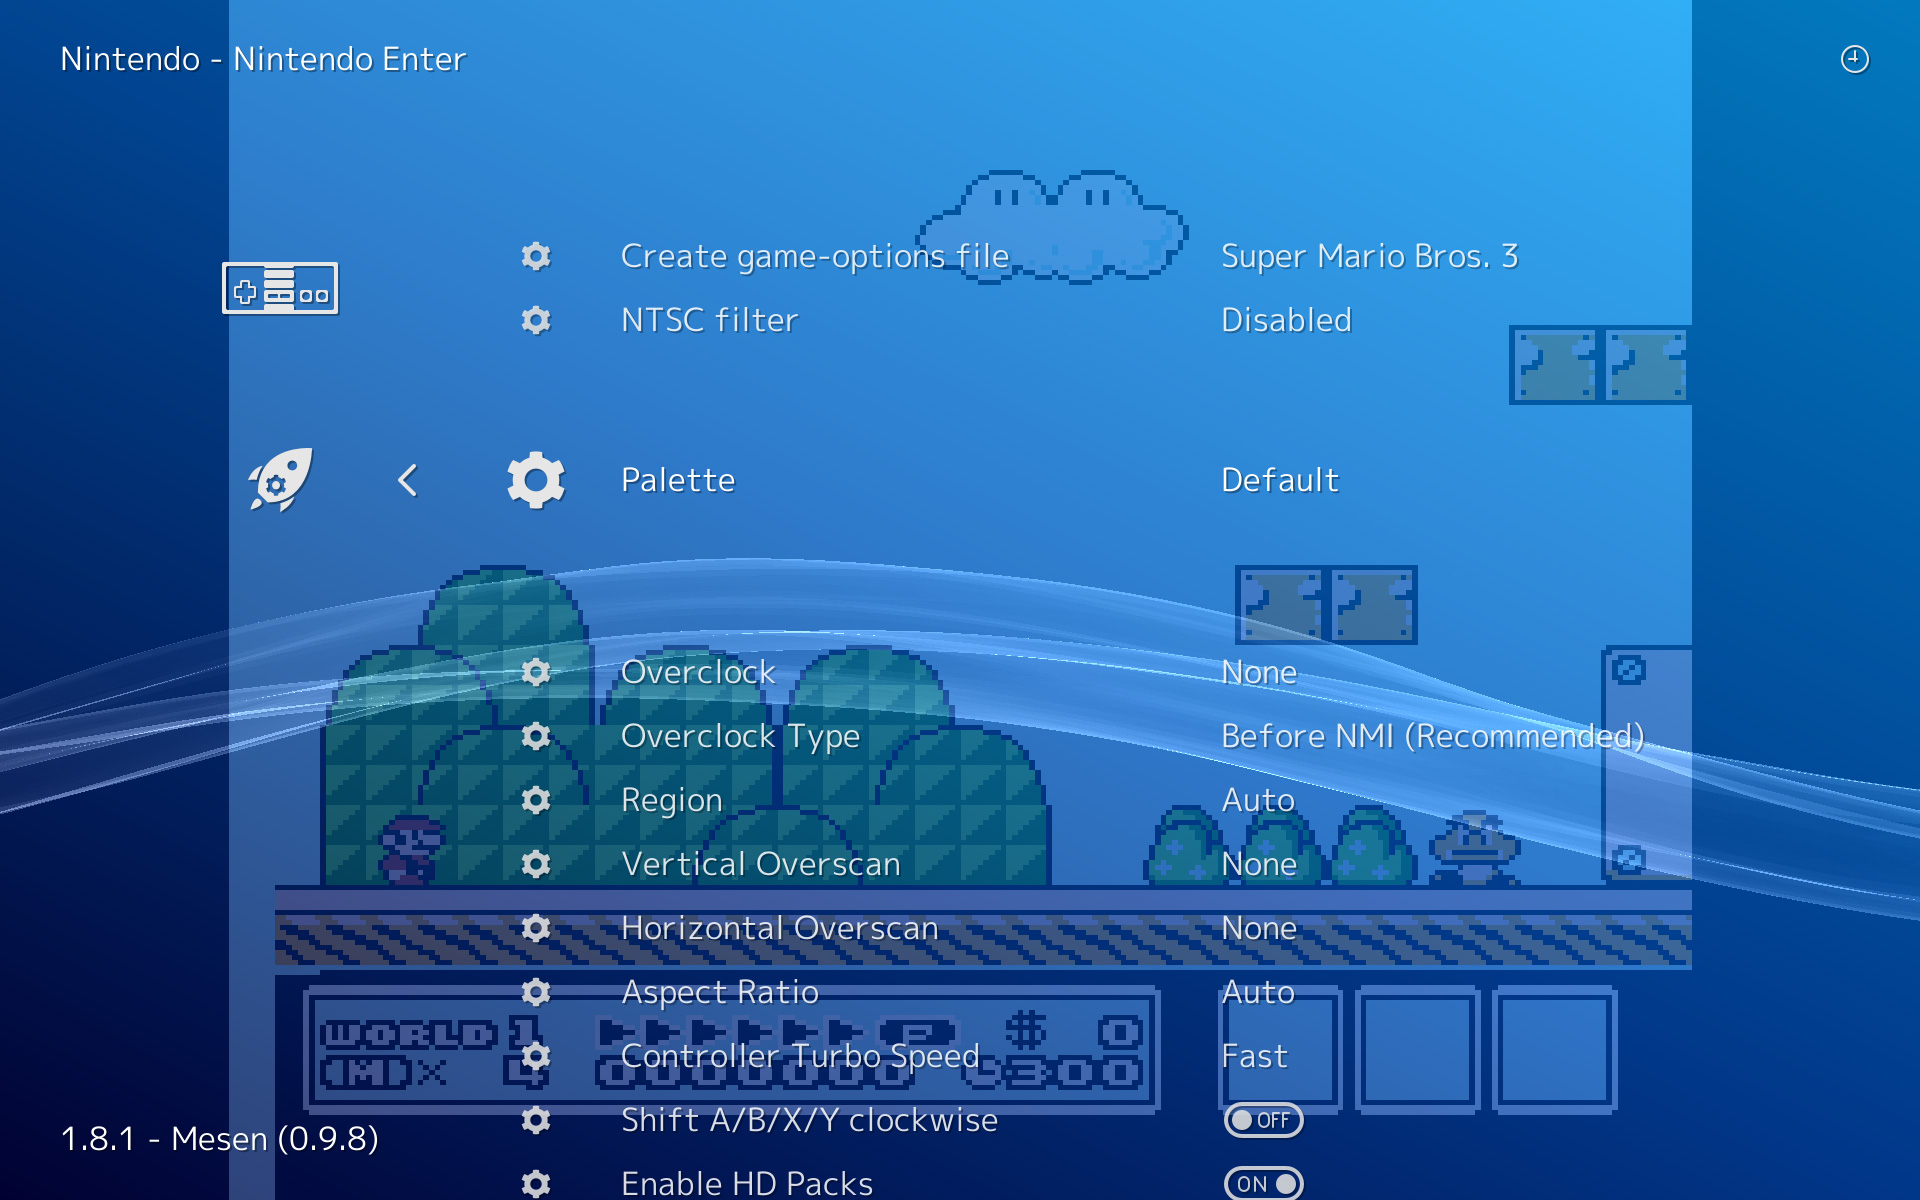
Example: Resolution set in Nintendo Emulator Mesen’s Override, C:\Users\glytch\RetroArch\config\Mesen\Mesen.cfg.
custom_viewport_width = “640”
custom_viewport_height = “480”
| Console | Resolution (Width x Height) |
| Arcade MAME | 224x256 |
| Atari 2600 | 160x192 |
| Atari 5200 | 320x192 |
| Atari 7800 | 320x240 |
| Game Boy | 160x144 |
| Game Boy Color | 160x144 |
| Game Boy Advance | 240x160 |
| Nintendo | 256x240 |
| Super Nintendo | 256x224 |
| Nintendo 64 | 640x480 1440x1080 4:3 HD 1920x1080 16:9 HD Widescreen |
| GameCube | 640x480 1440x1080 4:3 HD 1920x1080 16:9 HD Widescreen |
| Master System | 256x192 |
| Genesis | 320x224 |
| Sega CD | 320x224 |
| Saturn | 320x224 1440x1080 4:3 HD |
| Dreamcast | 720x480 1440x1080 4:3 HD 1920x1080 16:9 HD Widescreen |
| PlayStation 1 | 256x224 1440x1080 4:3 HD 1920x1080 16:9 HD Widescreen |
| PSP | 480x272 1920x1080 16:9 HD Widescreen |
| 3DO | 320x240 |
| TurboGrafx-16 | 256x239 |
| TurboGrafx-CD | 256x240 |
| DOS | 320x200 640x480 |
| MSX | 256x192 |
| PC Engine | 256x224 |
| Amiga | 320x200 640x400 |
Settings
Driver
| Driver | Option |
| Input | dinput |
| Joypad | xinput |
| Video | gl |
| Audio | xaudio |
| Audio Resampler | sinc |
| Camera | null |
| Location | null |
| Menu | xmb |
| Record | ffmpeg |
Video
| Video | Option |
| Windowed Fullscreen Mode | Off (Decrease input lag), On (Faster window switching) |
| Aspect Ratio | Custom (Uses Viewport) or Choose a preset such as 4:3 |
| Custom Viewport | Set desired width/height and aspect ratio |
| Windowed Scale | Adjust to fit Windowed size |
| Integer Scale | On (Prevents warped pixels keeping 1:1 ratio) |
| HW Biliner Filtering | Off |
| Threaded Video | Off (Turn On to reduce stuttering) |
| Vsync | On |
| Hard GPU Sync | On |
| Hard GPU Sync Frames | 0 (Increase to 1 to reduce audio crackling) |
| Frame Delay | 0 |
| Video Filter | N/A or a Filter such as NTSC |
G-Sync / FreeSync
| VSync | Off |
| Audio Sync | On |
| In your cfg file, set: | audio_rate_control = “false” |
| http://libretro.com/forums/showthread.php?t=4593&highlight=g-sync | |
Audio
| Audio | Option |
| Audio Latency (ms) | 64 (Increase to reduce stutter) |
Input
| Input | Option |
| Menu Toggle Gamepad Combo | Start + Select (This will bring up the Quick Menu during gameplay) |
| Input User 1 Binds | User 1 Bind All (Set your gamepad buttons. Let time out for missing buttons.) |
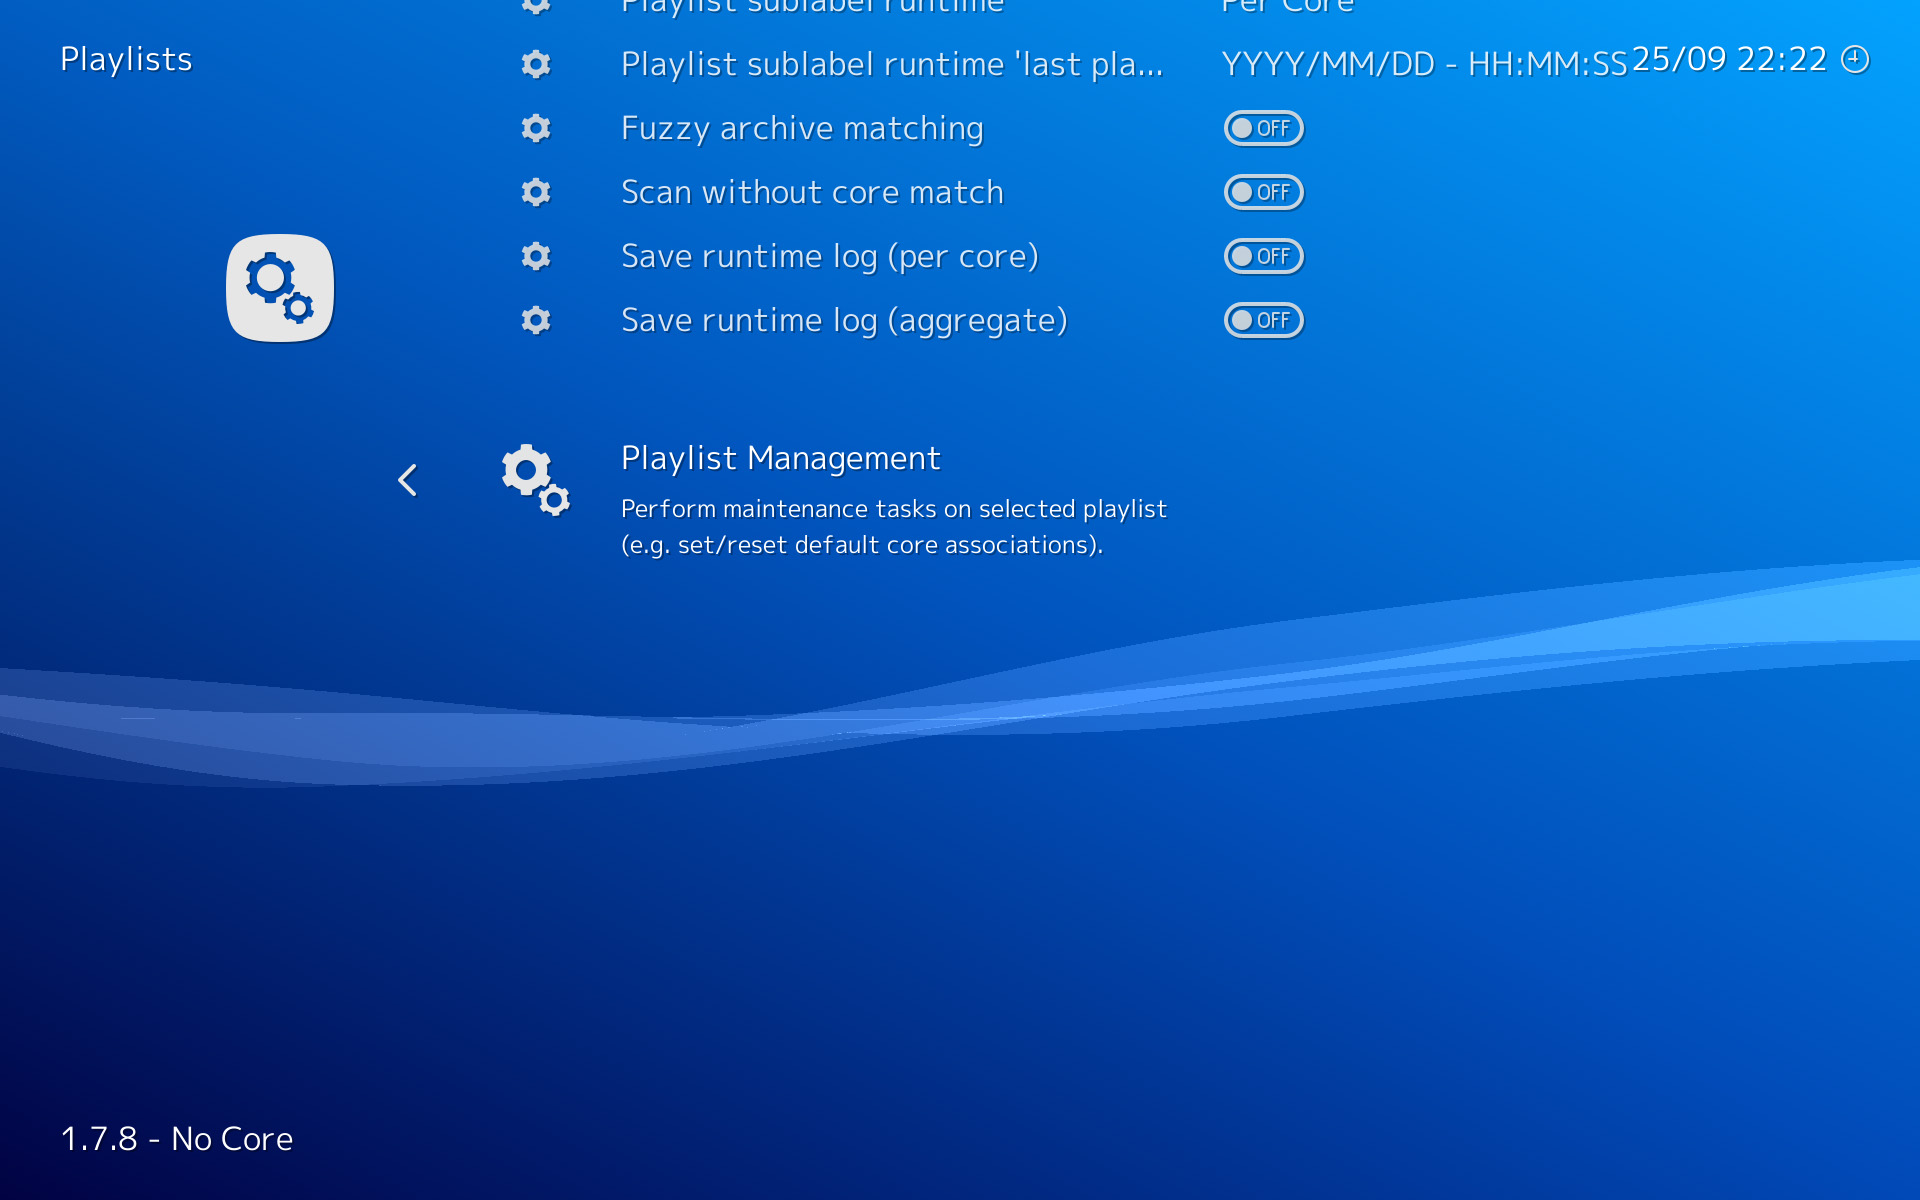
Playlists
| Playlists | Option |
| History List Enable | On |
Set each Console Playlists default cores.
Directories
Set the default folders to be loaded at startup.
Thumbnails
Automatic: Main Menu → Online Updater → Thumbnails Updater
Manually: from https://github.com/libretro/libretro-thumbnails (Large download). You can save individual ones for just the games you have.
Place in \RetroArch\thumbnails directory using the exact folder paths and names as in the download.
Thumbnail filename must match the ROM’s in-game Title. If that doesn’t work, try the ROM’s filename.
Checksums
RetroArch Playlists only recognize game filenames from Redump.
If your game will not start, download the proper cue sheets and dat files here.
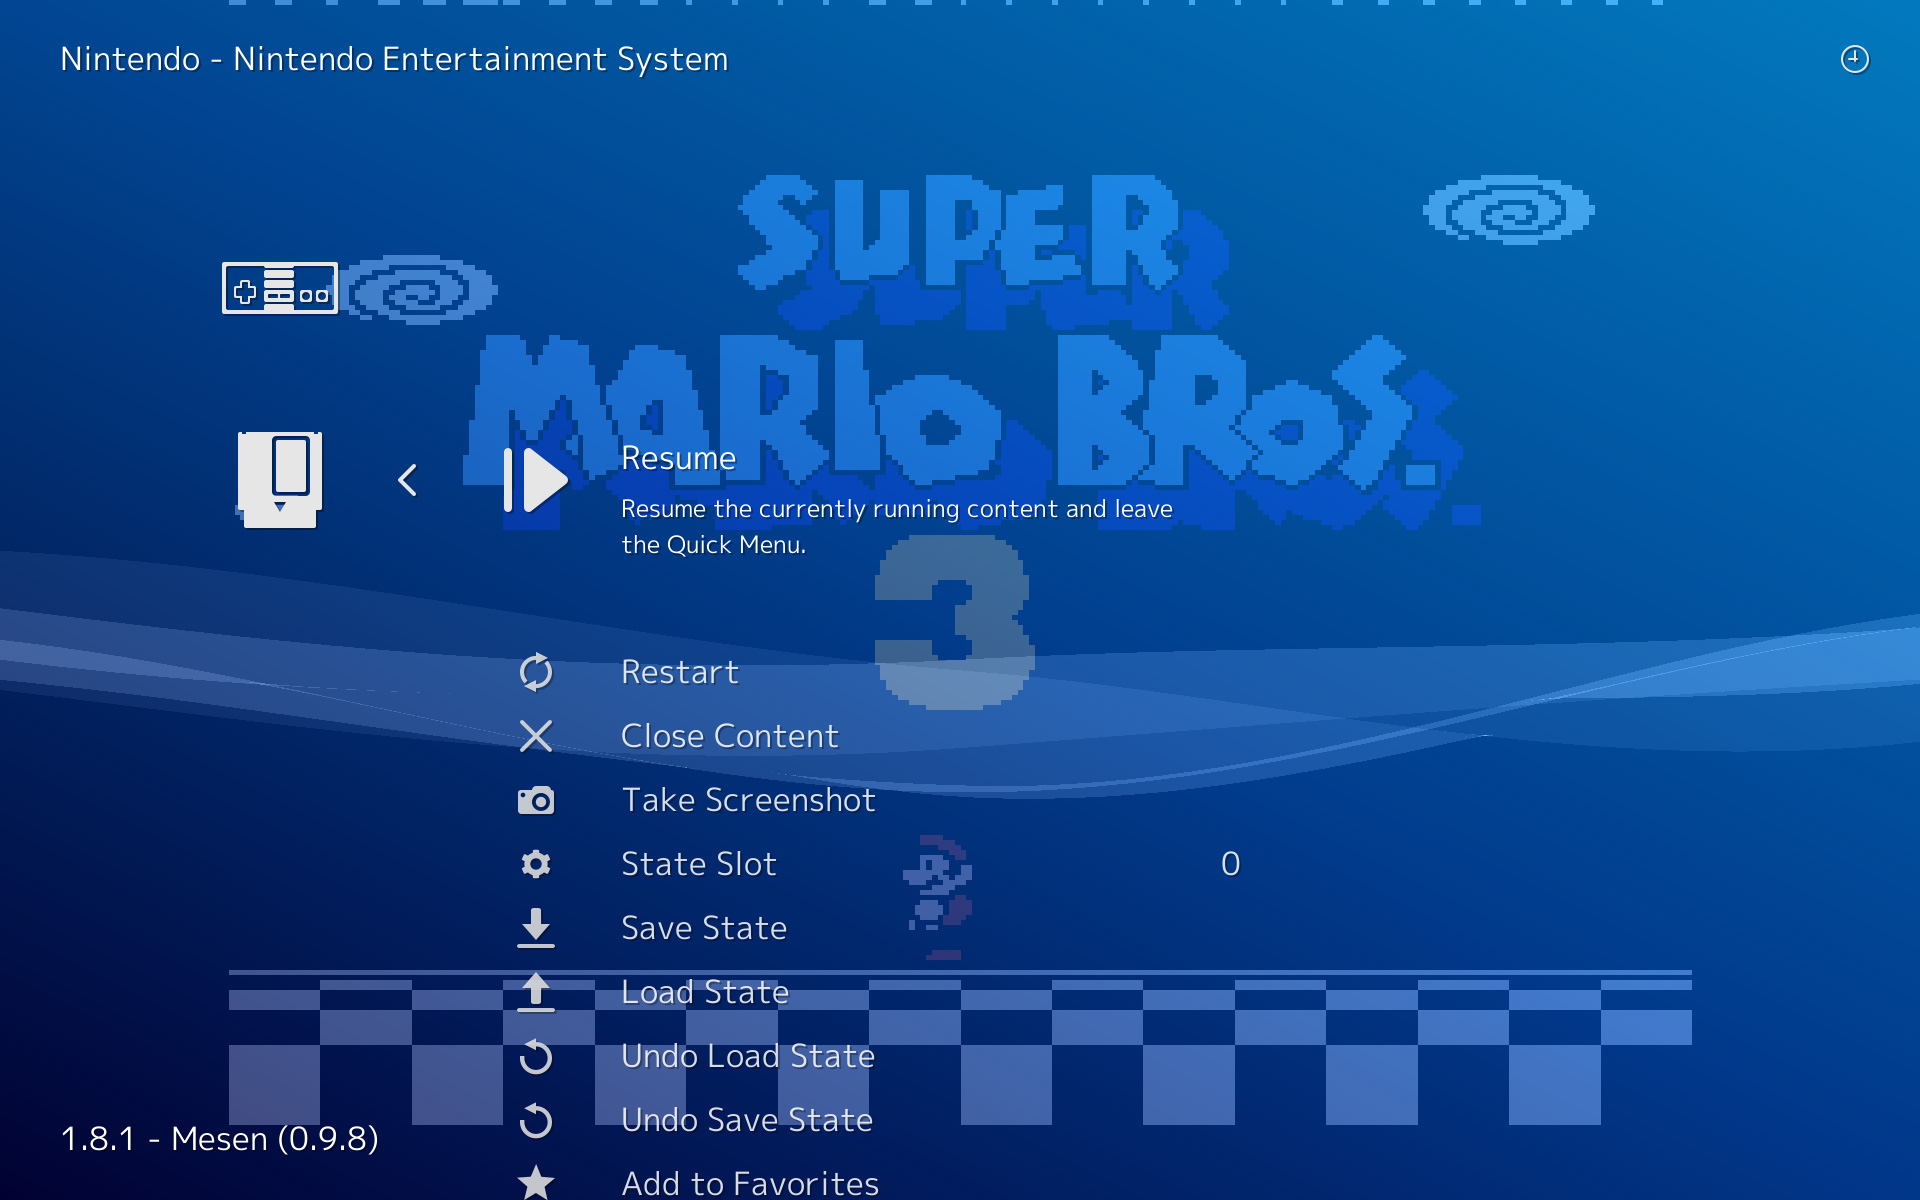
Quick Menu
You can access this menu after loading a Core or during gameplay by pressing Start + Select on gamepad or F1 on keyboard.
If using a gamepad you will need to set the button combo. Go to Settings → Input → Menu Toggle Gamepad Combo.
Options
Core-specific options can be set here, such as overclocking and rendering effects
Config file is located at \RetroArch\config\retroarch-core-options.cfg
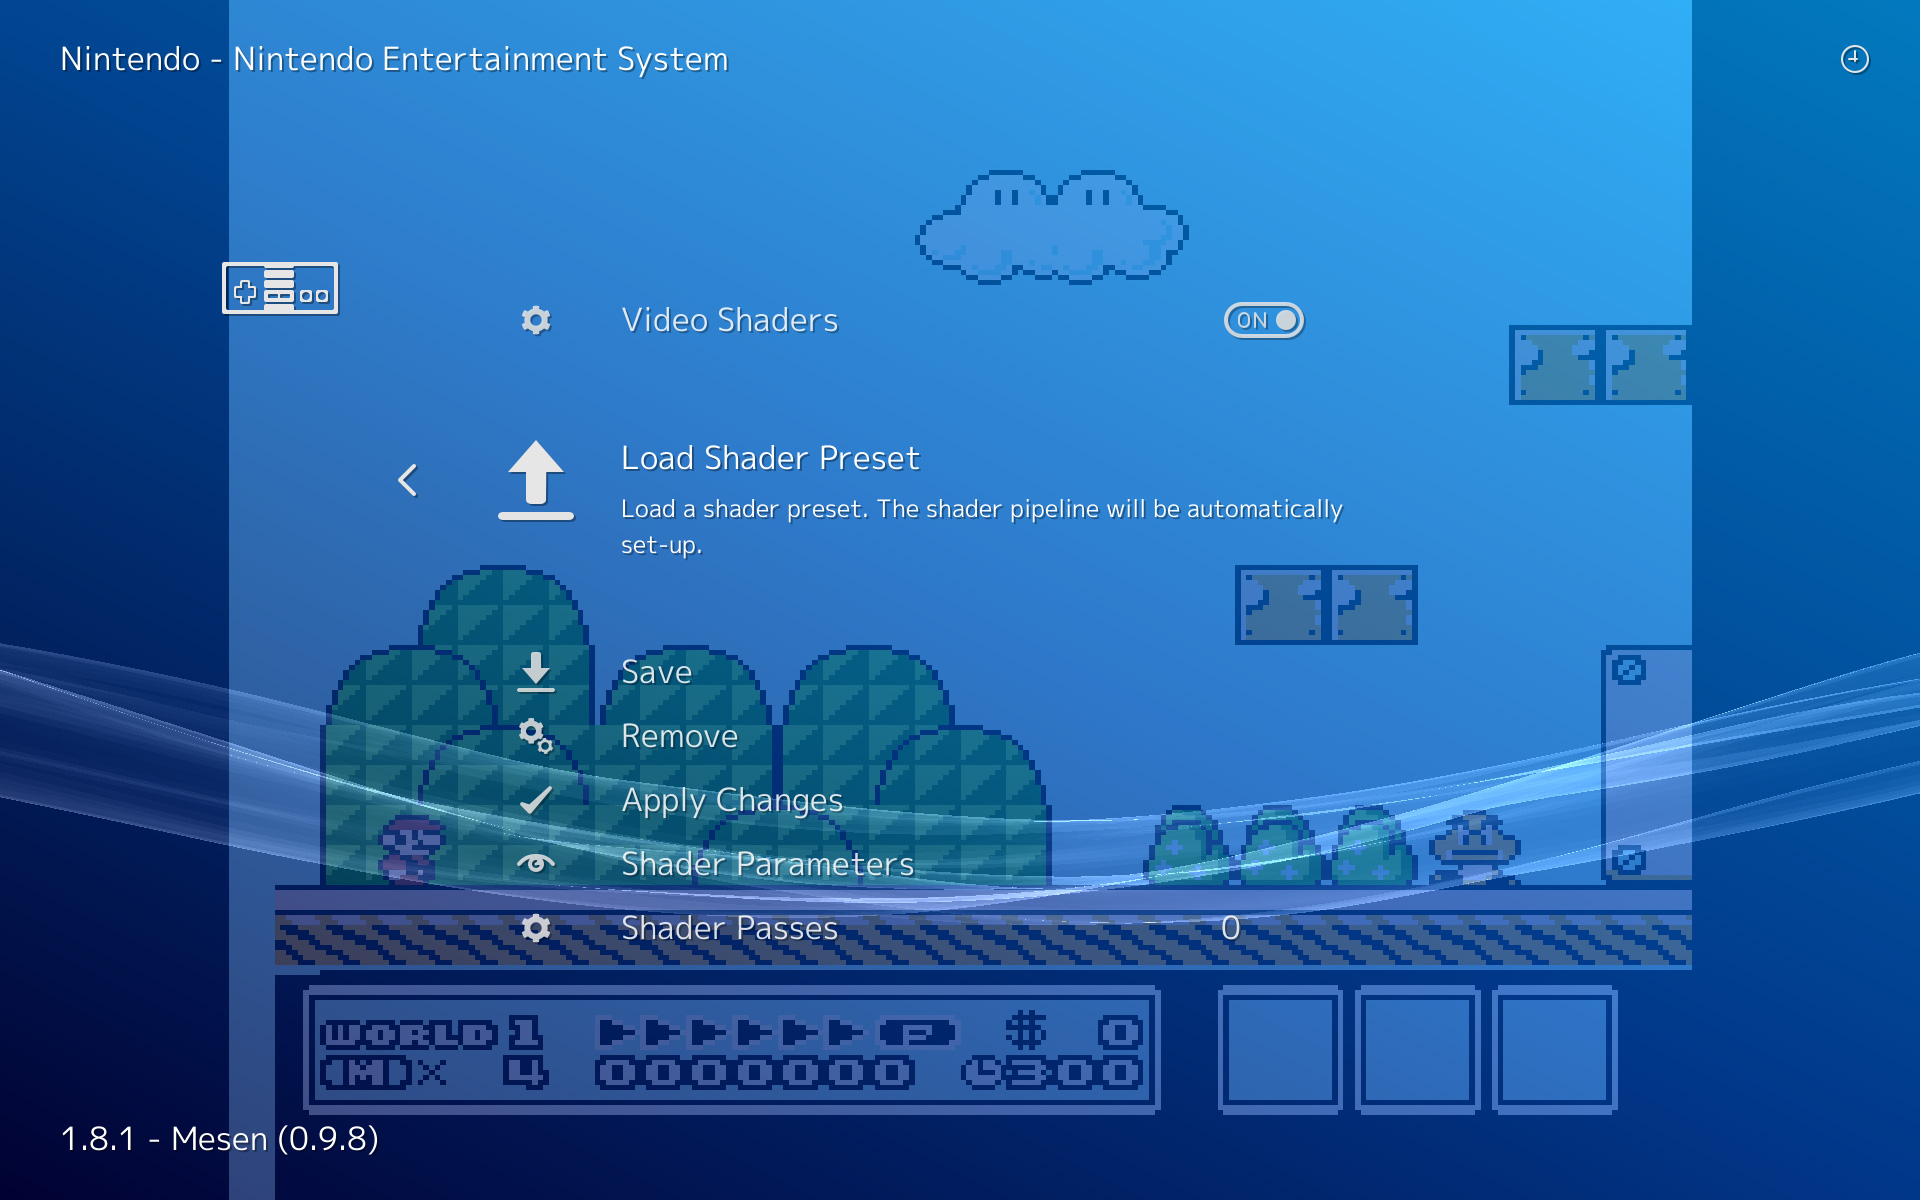
Shaders
Load and Apply Shader Presets here in the Quick Menu.
Saves
Save Files are located in \RetroArch\saves and can be transferred between cores.
Save State files are located in \RetroArch\states and can only be used with the core that created the save.
Converting Saves
Project64 - pj64tosrm Tool. Drag and drop into the exe to convert sra/eep/mpk/fla saves to srm.
PS1 to PSP - PSX-PSP Memcard Tool. Converts PS1 .mcr to PSP/PS1 .vmp and back.
Game Boy .srm to .sav
http://www.mediafire.com/download/iz71k0iush8g1fm/Save+Converter.exe
Drag and drop the .srm save file onto the .exe.
Rename the .srm file to .sav.
Shaders
https://github.com/libretro/common-shaders
Caution: Shaders may cause your PC or Laptop to run hot. Use a temperature monitor such as Speccy.
CRT Scanlines
These are included in common-shaders-master.zip
| Shader | |
| Royale |
Highly configurable with Aperture Grille, Slot Mask, EDP Shadow mask options. Kurozumi Edition - Configured to look like Sony’s PVM/BVM monitors. |
| Hyllian | Goal is picture quality. Another version CRT-Hyllian Fast, twice as fast and smoother. Runs well on low end systems. |
| Glow | By Maister, similar to CRT-Hyllian Glow. |
| Caligari | Older shader, by xythen, for 3x scaling or higher. Dark scanlines with phospher bloom. |
| Geom | Aperture Grille with dot mask. Standard/Sharpness/Halation. |
| Lottes | Along the style of a really good CGA arcade monitor. Shadow mask rotated 90 degrees for less chromatic aberration. |
| Easymode | Lightweight, works well on low end graphics cards and laptops. |
| GTU | Highly configurable. No phosphor or shadow masks. Sharp, blur, contrast, gamma, and scanline settings. GTUv050 Cg, GTUv040 Quark, GTU-Famicom Cg, GTUv50 Test program. |
| Raspberry Pi | http://libretro.com/forums/showthread.php?t=4937 |
Filters
RF, Composite, S-Video, RGB
Can be applied in Settings → Video → Video Filter, and sometimes in Core Options under Quick Menu → Options.
Blargg NTSC
Win32 | Win64 | Linux32 | Linux64 | MacOS
http://blargg.8bitalley.com/libs/ntsc.html
http://emulation-general.wikia.com/wiki/NTSC_Filters
Maister NTSC
https://github.com/libretro/common-shaders/tree/master/ntsc


Troubleshooting
Crash after changing Menu/Video Driver
Using a text editor, open the retroarch.cfg file located in the RetroArch root folder.
Manually change the line menu_driver or video_driver back to its original value, usually xmb or rgui.
Scan Directory/File won’t add to Playlist
You can try manually editing the Playlist’s file, located in the \RetroArch\playlists directory and add the game’s Path and CRC32 number.
Search on http://superfamicom.org for the number.
Example:
C:\Path\To\Final Fantasy V (Japan).sfc
Final Fantasy V (Japan)
DETECT
DETECT
C1BC267D|crc
Nintendo - Super Nintendo Entertainment System.lpl
Online Updater Not Working
Try running RetroArch as Administrator.
PS1 Game won’t launch
If the game is in CCD+IMG format, download it’s CUE file from http://redump.org.
Open the CUE file with a text editor. Match the filename and change .bin to .img.
Button Layouts
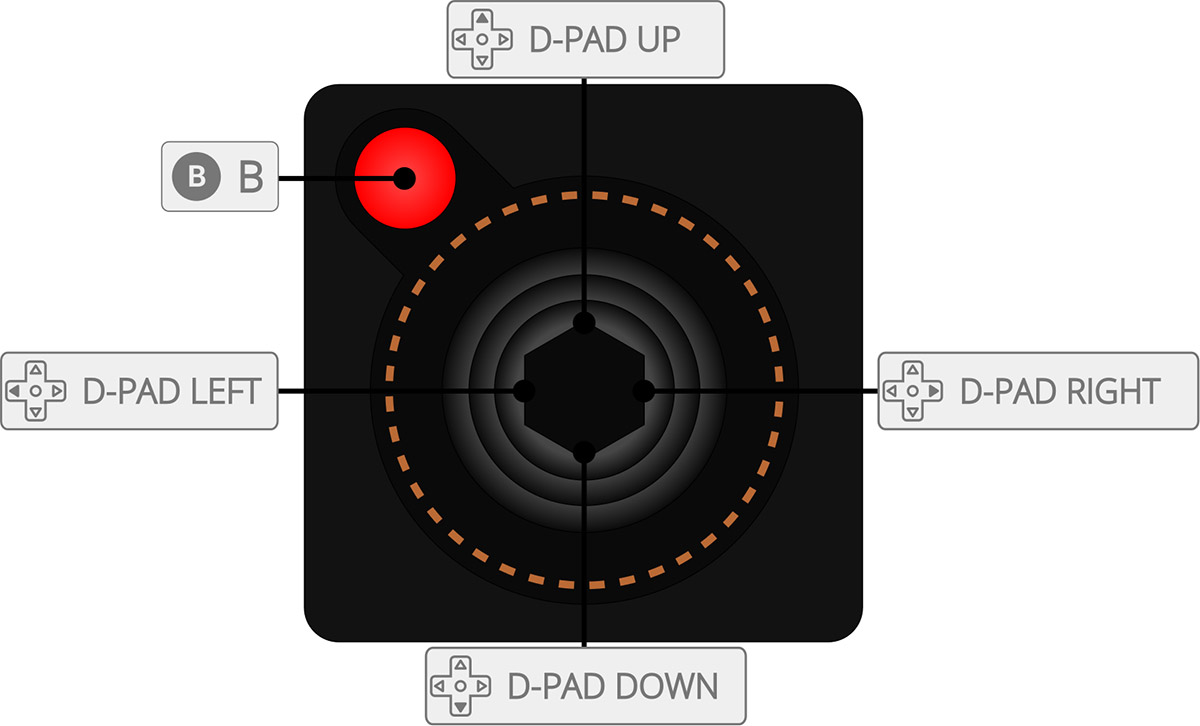
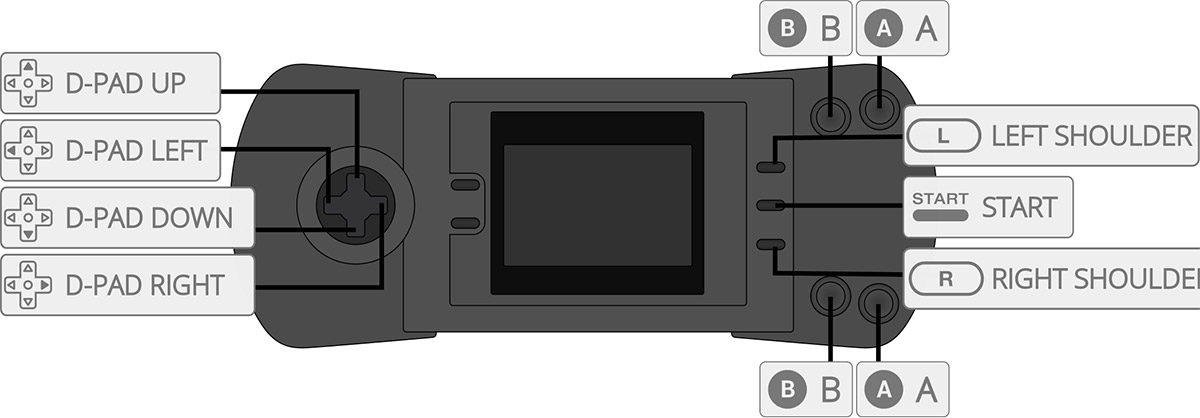
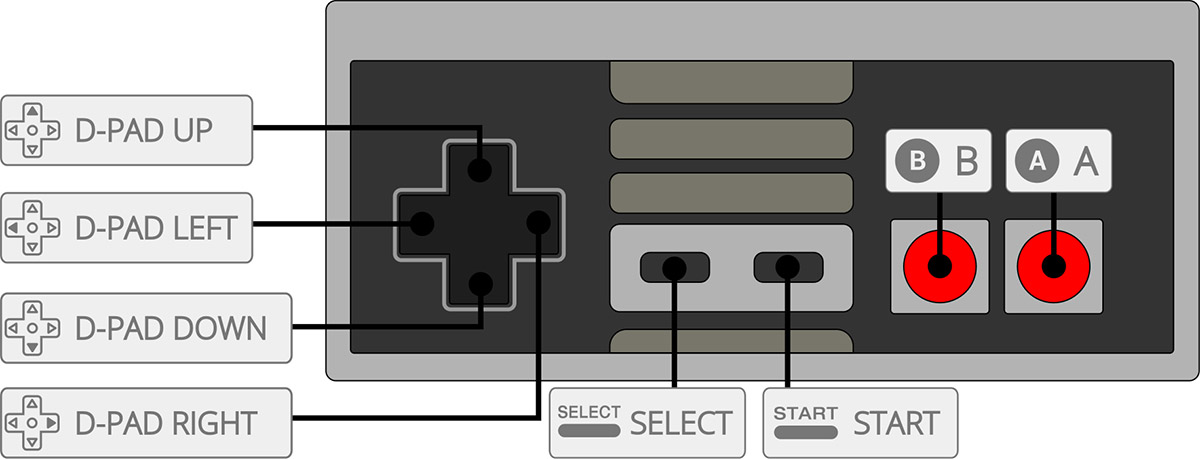
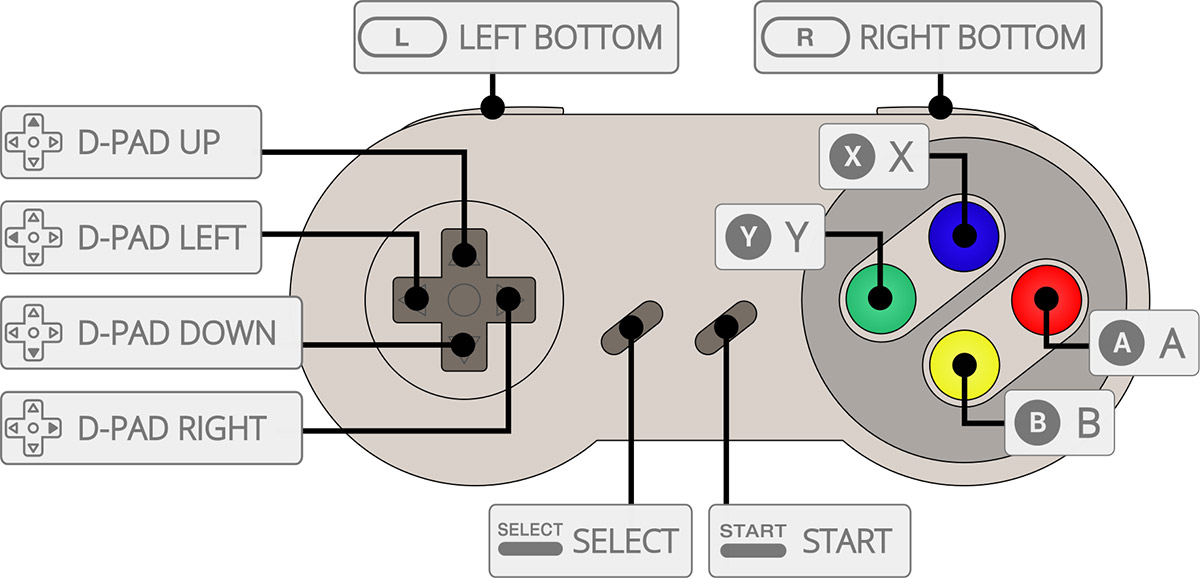
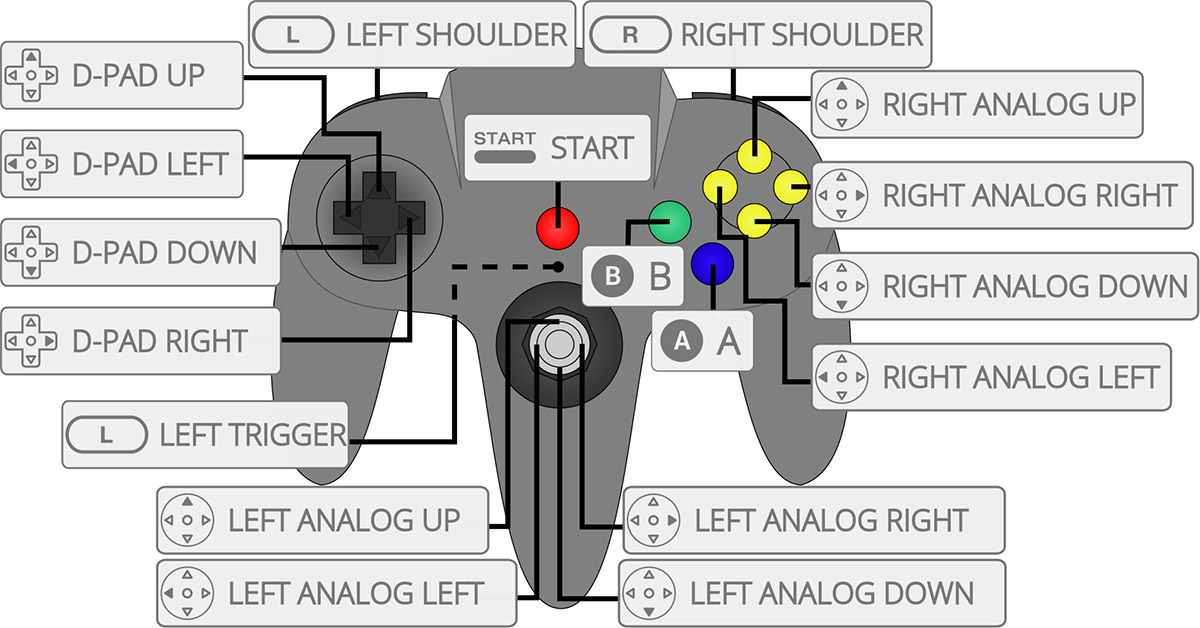
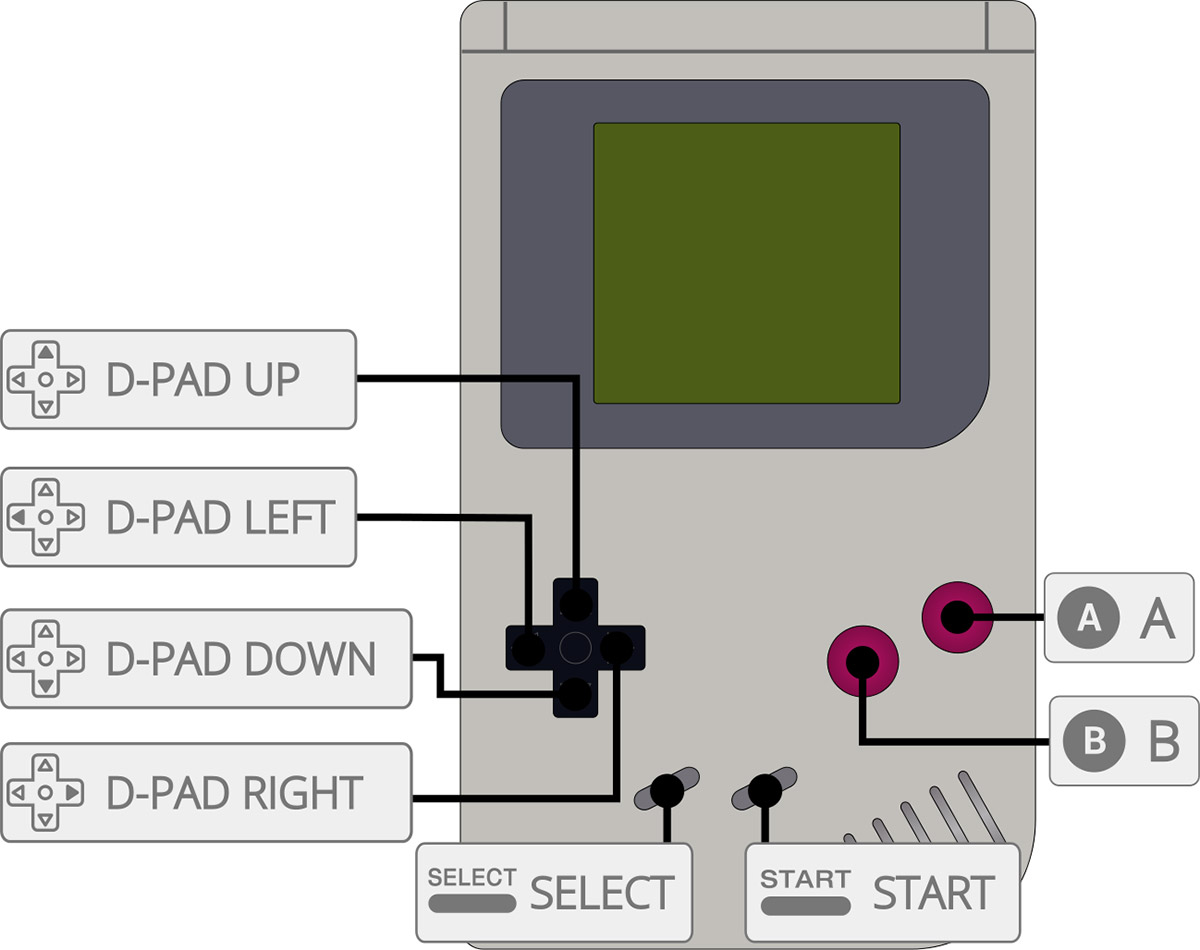
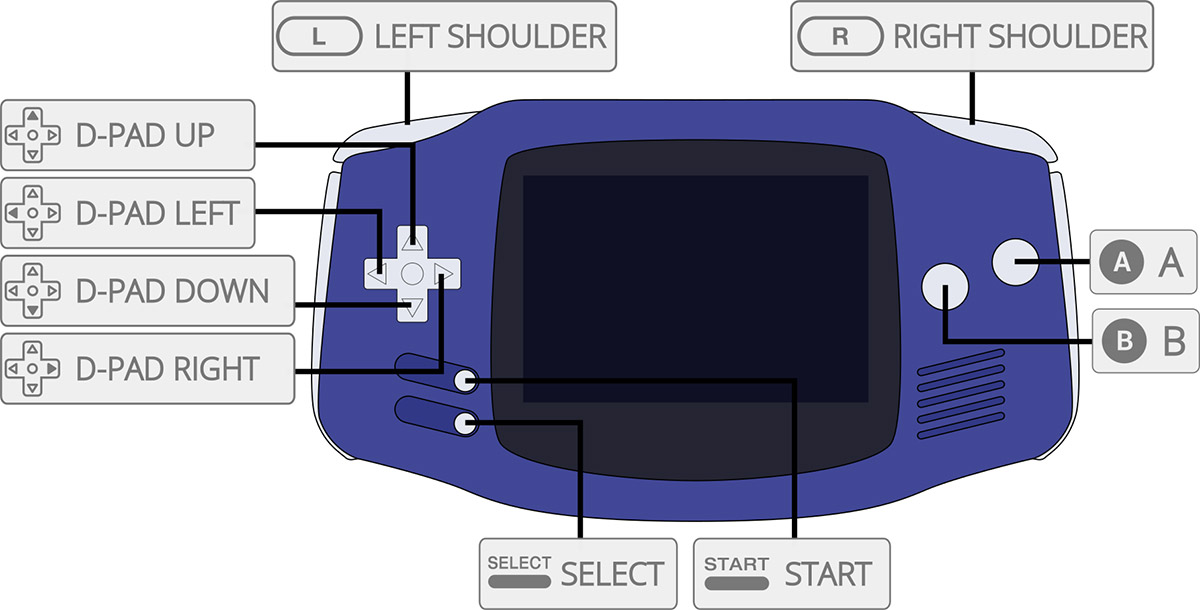

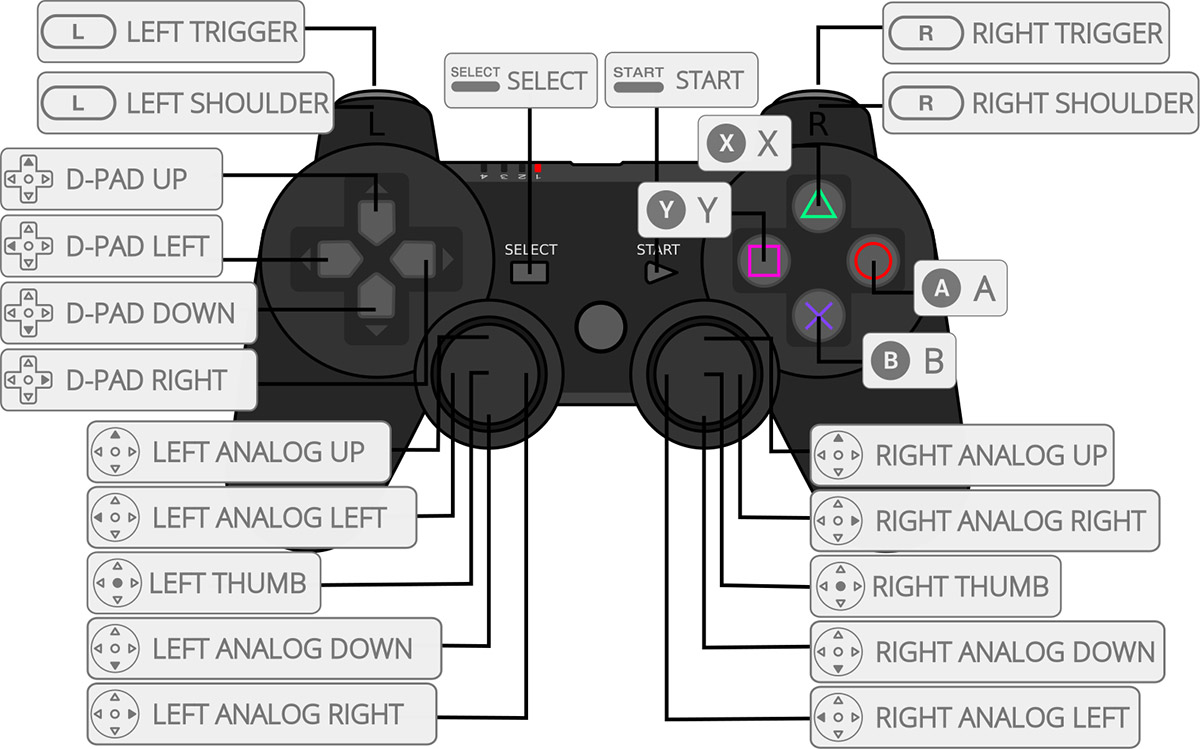
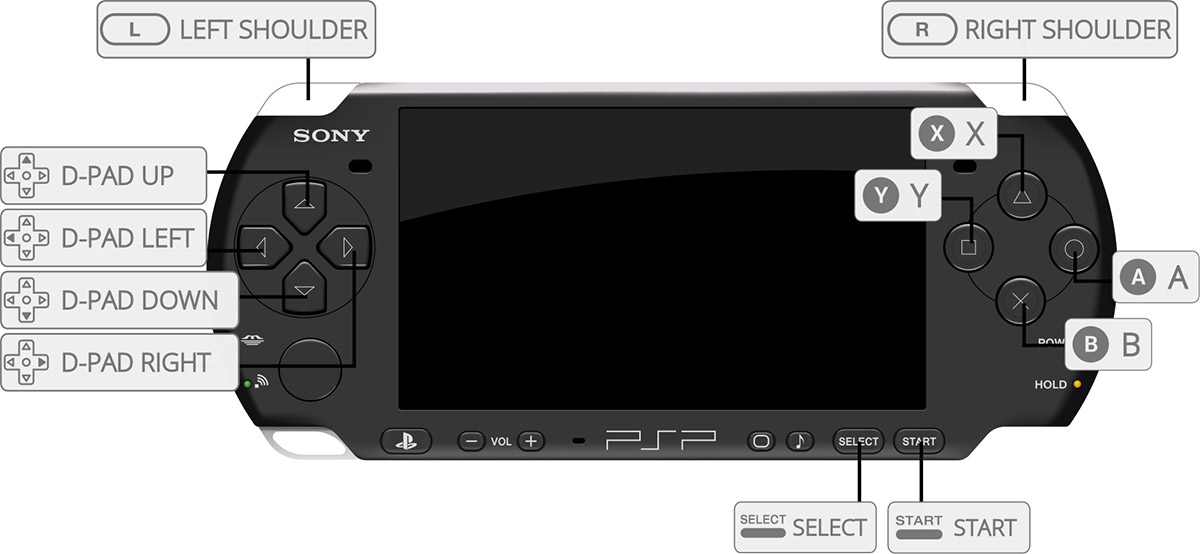
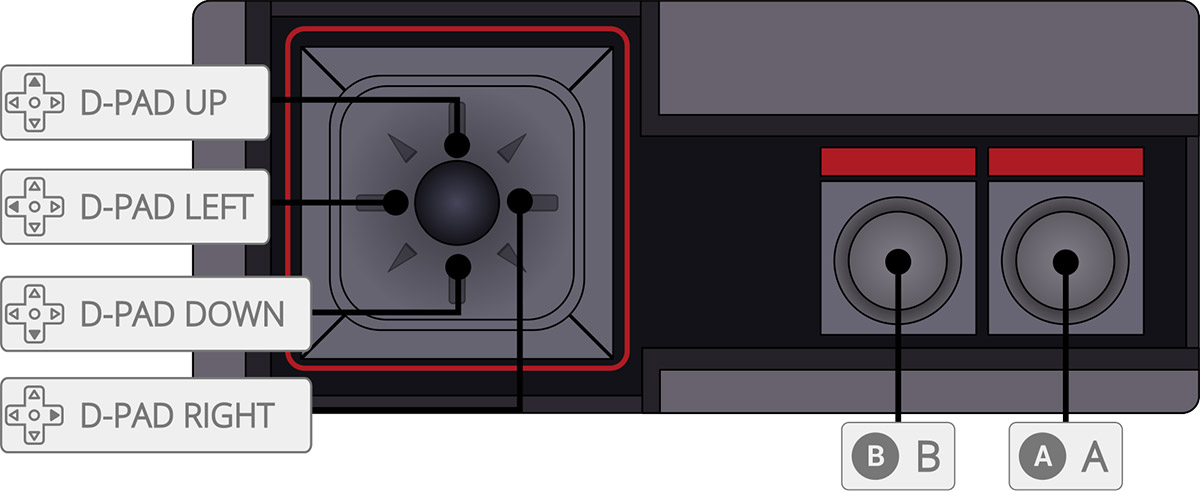
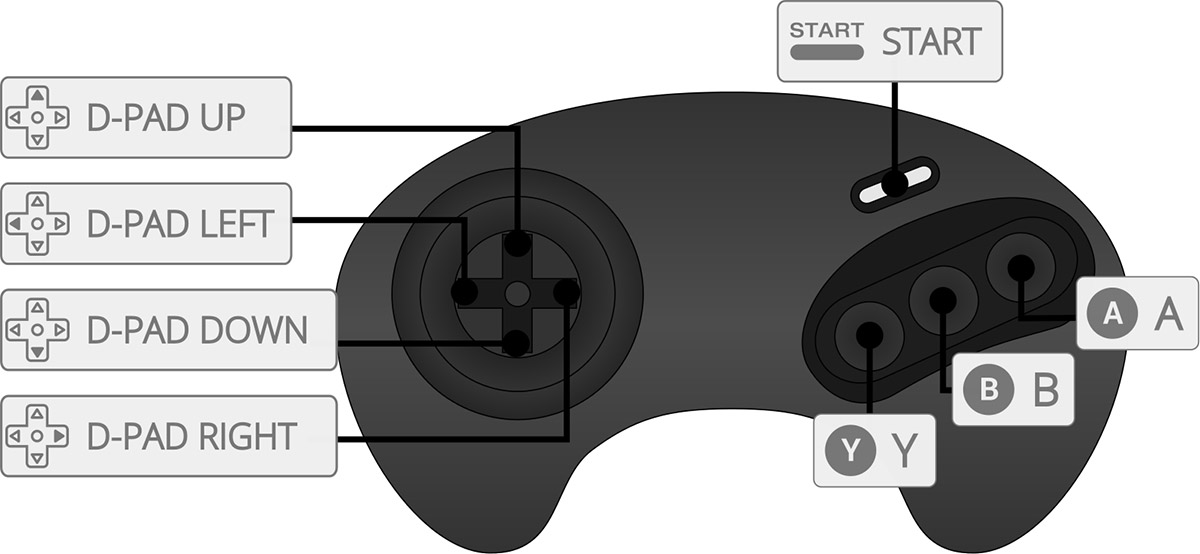
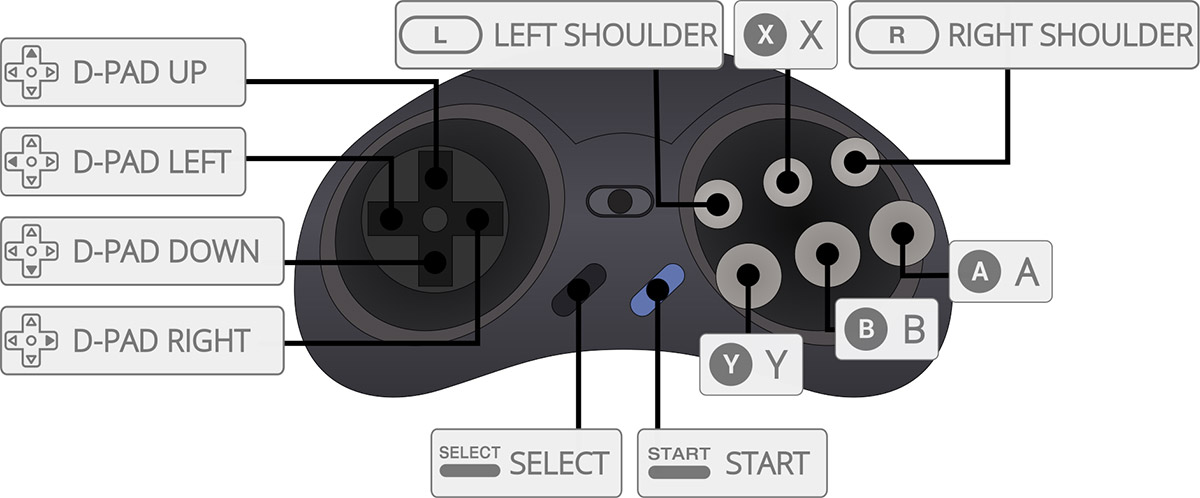
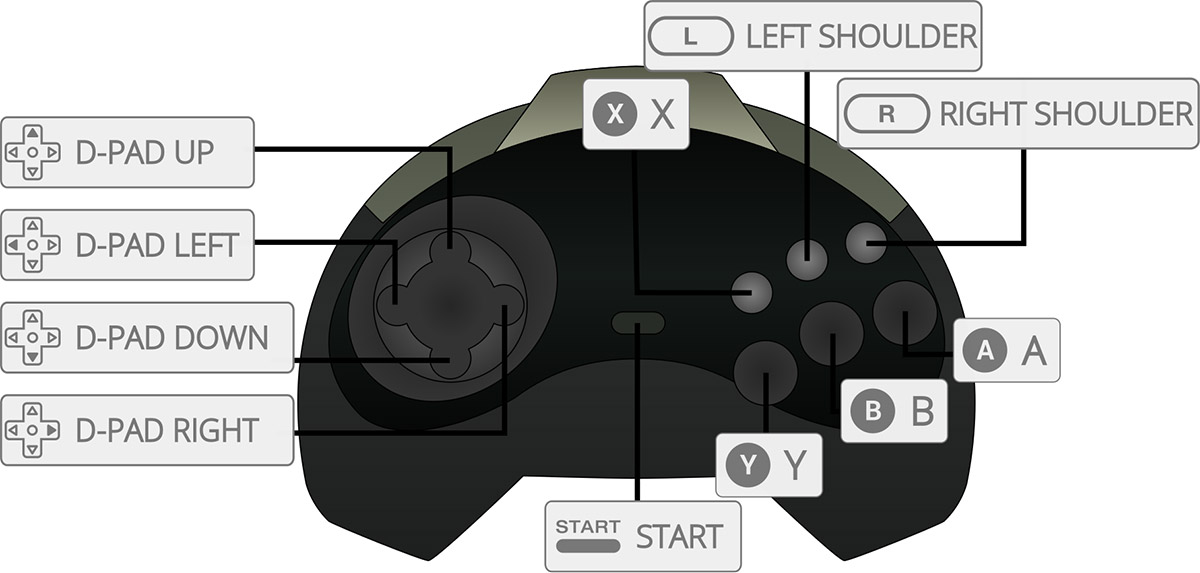
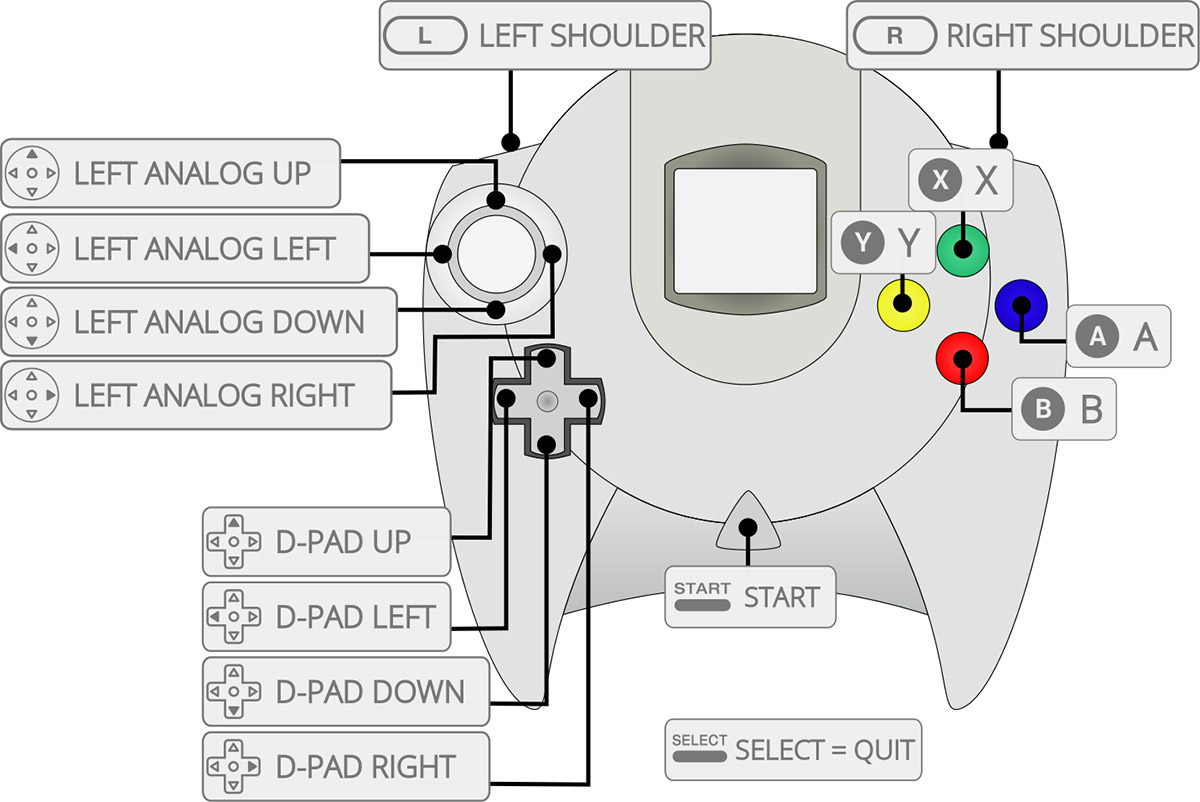
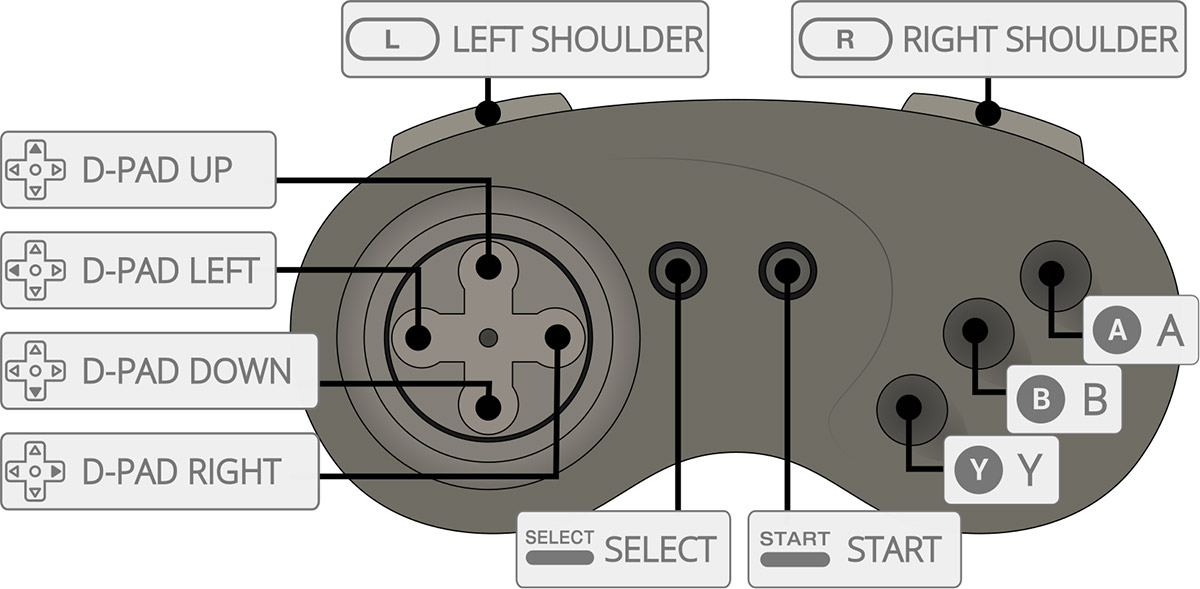
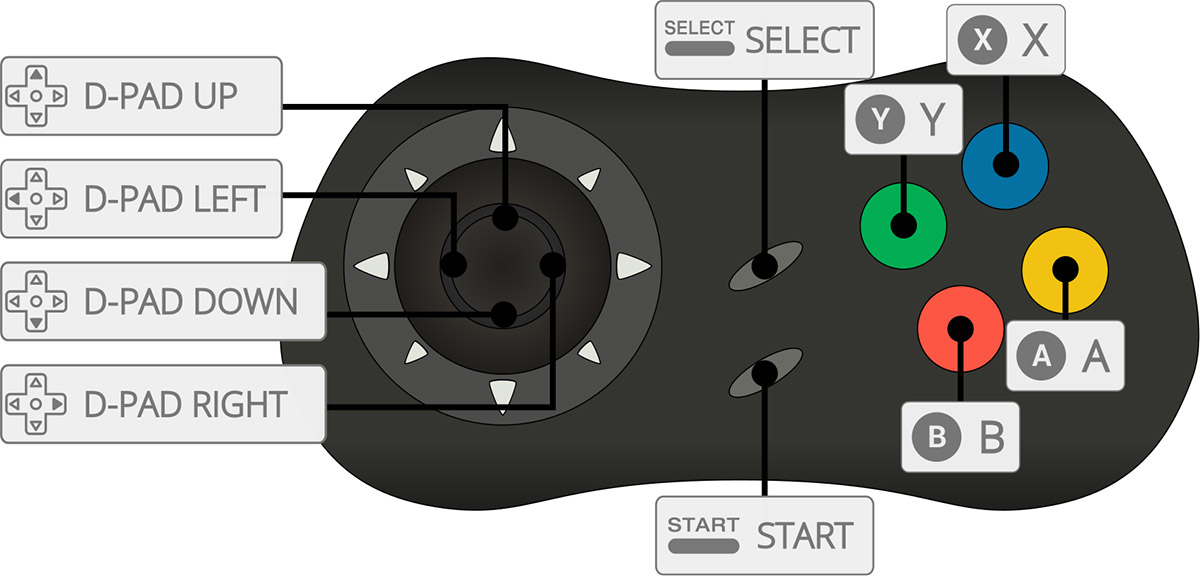
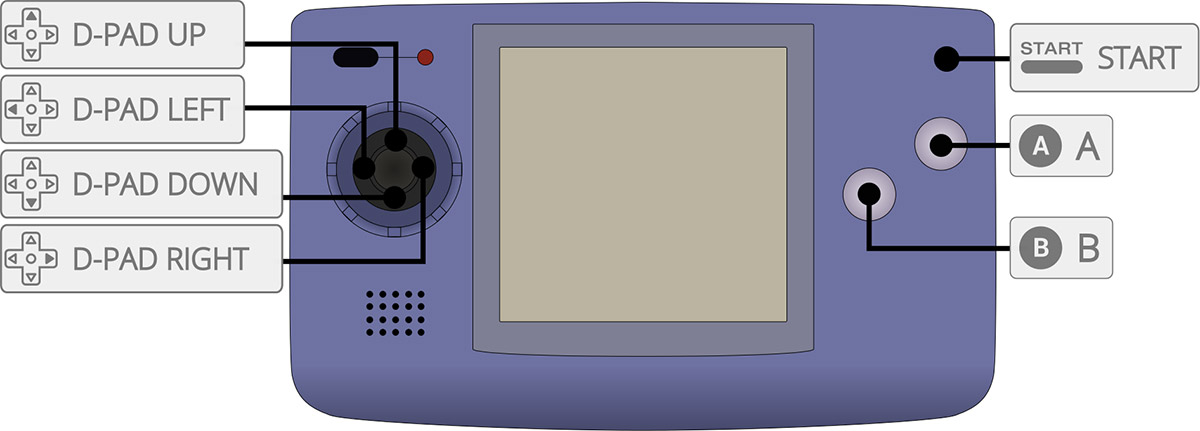
Images source: https://github.com/retropie/retropie-setup/wiki/retroarch-configuration